Pages

11.4.10

AJAX-Like File Uploading

Introduction


Currently, there's no direct way to upload files in a web page without refreshing the page. If you have an interactive page that is AJAX-enabled, you would like to support uploading files in a way similar to AJAX behavior.

Unfortunately, the XMLHttpRequest object doesn't support uploading files; therefore, I am trying to upload files using a workaround.

Background


First of all, before diving in to the subject, let's review some basic concepts of HTML forms. If you are already familiar with HTML forms, you can skip this section.

Basically, there are two main ways to submit a form. The first one is by clicking on an input control of type submit. Like the following:

<input type="submit" id="mySubmitButton" name="mySubmitButton" value="Submit Form" />

The other way is by calling a JavaScript code that submits the form, like the following:


function submitMyForm() {
         var theForm = document.forms['myForm'];
         theForm.submit();
    }

A form in HTML has several attributes that indicate how the form should be submitted; the following are some of these attributes:
  • action: it's a path to a web page to which the form should be submitted
  • method: the method of submitting the form (possible values include: POST, GET ...etc.)
  • enctype: the way the submitted data should be encrypted
  • target: the frame in which the form should be submitted

Once a page is submitted, either by clicking on the Submit button or by calling a JavaScript that submits the form, the browser checks the action of the form to be submitted, and then it will load the action -web page- sending it the contents of the form, encrypted using the encryption method specified in the encrypt attribute.

Prepare the Page


Two pages are going to be used to implement this technique. The first one will hold the HTML content, including the file upload control. The second one will contain the server-side code to save the file to the server.

Let's start by adding controls to the first page. Of course, we'll need to add a file upload control. In addition, we'll add an iFrame and a form. The HTML body of the page will look like this:

<body>
 
<!-- This is the form that we added -->
<form id="myForm" name="myForm" target="myIFrame" method="post" action="SaveFile.aspx"
enctype="multipart/form-data">
</form>
 
<!-- This is the form which is added by default -->
<form id="form1" runat="server">
 
<!-- This is the file upload control -->
<input type="file" id="myFile" name="myFile" runat="server" />
 
<!-- This is a normal button that will be used
to the JavaScript function to upload the file -->
<input type="button" value="Upload File" />
 
<!-- This is an iFrame in which the form will be submitted -->
<iframe style="display: none;" id="myIFrame" name="myIFrame"></iframe>
 
</form>
</body>

Note that we added the form outside the form that was added by default to the page. We also set the action property to the second page URL, as mentioned earlier. The iFrame style is set to keep it hidden so we won't notice it when the file is being uploaded.


JavaScript


Now, we want to let the button call a JavaScript to submit the form and upload the file. In order to do that, we'll add a JavaScript function to the page and call it uploadFile. We'll also call this function at the button's click event. The following is the JavaScript function:

<script type="text/javascript">

function uploadFile() {
 
     // get the form that we added
     var theForm = document.forms['myForm'];
 
     // some browsers don't recognize the line above,
     // so this line is added for browser compatability
     if (!theForm)
          theForm = document.myForm;    
 
     if (!theForm.onsubmit || (theForm.onsubmit() != false)) {
 
          // get the file upload control
          var theFile = document.getElementById("myFile");
 
          // add the file upload control inside the form
          theForm.appendChild(theFile);
 
          // submit the form
          theForm.submit();
     }
}

</script>

Save the File


The second page, SaveFile.aspx, contains the code that saves the file on loading, as follows:

protected void Page_Load(object sender, EventArgs e)
{
     Request.Files["myFile"].SaveAs("path on the server to save the file");
}

Compatible Browsers


This technique was tested on Microsoft Explorer 8 and Google Chrome.

Iff statement in VB.NET

As a C# developer, I'm accustomed to using the one-line conditional statement; (condition) ? (true condition code) : (false condition code); So when I started to write VB.NET recently, which I abandoned several years ago, I found it nice to use the Iff function.

Any way, I was surprised by its behavior, until I came back to my common sense and realized that Iff is not a keyword in VB.NET but rather it's a function, like any other function.

The following statement will always cause a run-time error:

Dim x As MyObject
Dim y As Integer
x = Nothing
y = Iff(x IsNot Nothing, x.MyValue, 5)

You might wonder, why it causes a run-time error when I'm asking it to return 5 when x is nothing. But, in fact, because Iff is like any function, it receives 3 parameters; the first one is the condition, the second one is the value to be returned when the condition is true and the third is the value that should be returned when the condition is false. The last 2 parameters are always evaluated regardless of the condition.

Implement Sequence in Sql Server

Problem


In many cases, a database developer would rely on the DBRMS to generate and auto-increment a primary key in a table. In Oracle, for instance, the "Sequence" feature provides an encapsulated functionality to handle incrementing any particular variable. A sequence is not necessarily attached to a particular table, but rather, it's considered an independent entity that can be used amongst several tables.

In Sql Server, however, the sequence feature is replaced by the Identity column feature. One and only one column in any table can be defined as identity, and then the Sql Server will take over the job of incrementing this column with the certain value specified by the developer.

In some cases, a developer might need to make a column auto-incremented while it's not the table's primary key. Since Sql Server allows only one identity in a table, which might sound logical because a table wouldn't and shouldn't have more than one identity, a developer should handle incrementing this column manually.

One solution to this problem can be reading the last value of the field and then incrementing it and inserting the new record with the incremented value. However, this has integrity issue. Suppose two users consume the table simultaneously, both of them will read the same value and increment it with the same amount resulting in the same field for both records.

Solution


Another solution that proved its efficiency is the following:

1. Create a table with the column that you want to be incremented

CREATE TABLE [MyTable](
 
[SomeInfo] [nvarchar](50) NULL,
 
[IncrementedColumn] [int] NULL
 
) ON [PRIMARY]

2. Create a table and call it sequence

CREATE TABLE [Sequence](
 
 [SequenceColumn] [int] NULL
 
) ON [PRIMARY]

3. Insert a value into sequence table to start incrementing from it.

INSERT INTO Sequence (SequenceColumn)
 
VALUES (5)

4. Whenever you want to insert a new record into 'MyTable', update the sequence using the following:

DECLARE @NewSequence INT
 
UPDATE Sequence
SET @NewSequence = SequenceColumn = SequenceColumn + 1

and then you can use @NewSequence to insert a record into 'MyTable'

Creating a Numeric TextBox Control

Numeric TextBox

Introduction


In this article, we'll learn step-by-step how to create a custom textbox control that only accepts numeric characters. The control will allow the client code to specify whether it should work as an integer or decimal textbox.

This custom control will be implemented using Visual Studio 2008. However, the same code can be written using previous versions of Visual Studio. The programming languages I'm going to use are: C# and JavaScript.

Prepare the Project


First of all, let's prepare the project and the files that we're going to use. Please follow these simple steps:
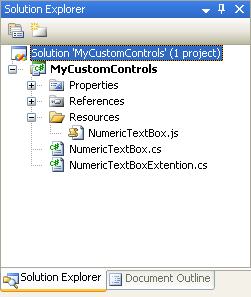
  1. Create a new project of type Class Library and name it MyCustomControls.
  2. Create new ClassLibrary project
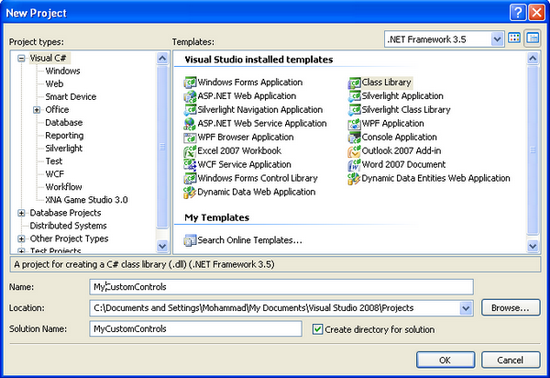
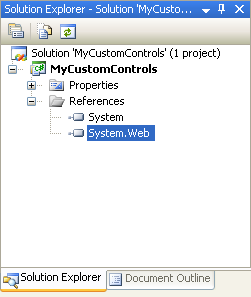
  3. Make sure that you add a reference to the System.Web library.
  4. Add reference to System.Web
  5. By default, Visual Studio will add a file named 'Class1.cs'. Please delete this file and add two files with the following names: NumericTextBox.cs and NumericTextBoxExtention.cs. In addition, create a new folder with the name 'Resources' and add a JavaScript file with the name 'NumericTextBox.js'.
  6. Insert the required files
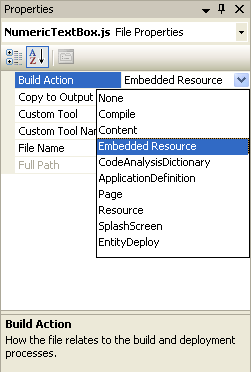
  7. In order to make the JavaScript embedded in the component, we need to change its BuildAction property to 'Embedded Resource'. Please refer to the figure below:
  8. Change javascript file BuildAction property to Embedded Resource

The C# Code


Why two C# files?

As you may have already noticed, we have two C# files. Both of them will be used to implement the same class; NumericTextBox. However, the keyword partial will be added to the definition so the compiler will know that both classes represent one class in the end. The NumericTextBox.cs file will be used to implement the logic of our control, while the NumericTextBoxExtention.cs will contain any fields or properties.

Please have a look at the code below to see how we're going to define the NumericTextBox class in the NumericTextBox.cs file. Code Snippet 2 shows the code in the NumericTextBoxExtention.cs file.

Please note that the partial classes is a feature added to .NET version 2.0 and later versions. If you're using a 1.* version of .NET, you can alternatively place all your code in one class.

   1:  //
   2:  // Code Snippet 1
   3:  //
   4:   
   5:  using System;
   6:  using System.Web.UI;
   7:   
   8:  [assembly: WebResource("MyCustomControls.Resources.NumericTextBox.js", "text/javascript")]
   9:  namespace MyCustomControls
  10:  {
  11:      [ToolboxData(@"<{0}:NumericTextBox Text="""" runat=""server""></{0}:NumericTextBox>")]
  12:      public partial class NumericTextBox : System.Web.UI.WebControls.TextBox
  13:      {
  14:   
  15:      }
  16:  }


   1:  //
   2:  // Code Snippet 2
   3:  //
   4:   
   5:  namespace MyCustomControls
   6:  {
   7:      public partial class NumericTextBox : System.Web.UI.WebControls.TextBox
   8:      {
   9:   
  10:      }
  11:  }

Fields and properties

There are some attributes added in Code Snippet 1. Don't worry about them now, we'll talk about them later in this article. Now we want to see what properties we need to implement in the NumericTextBoxExtention.cs file.

Let's think of properties that we might need. First of all, we've said previously that our control will work for both integers and decimals. So it would be wise to add a property named Type. This property can be of type int or string. However, I think it's a better practice to add an enum named TextBoxType and let our property's type be of this enum.

Additionally, we'll need a property to specify the number of integers allowed. And, in the case of the decimal textbox, we'll also need a property to specify the maximum number of fractions allowed after the decimal point. Furthermore, we'll add a property to specify whether this control should accept negative values or not. Please have a look at Code Snippet 3 to see how this will be implemented.


   1:  //
   2:  // Code Snippet 3
   3:  //
   4:   
   5:  public enum TextBoxType
   6:  {
   7:      Integer,
   8:      Decimal
   9:  }
  10:   
  11:  private int _NumberOfFraction = 0;
  12:  private int _NumberOfInteger = 0;
  13:  private bool _AllowNegative = false;
  14:  private TextBoxType _Type = TextBoxType.Integer;
  15:   
  16:  public int NumberOfFraction
  17:  {
  18:      get { return _NumberOfFraction; }
  19:      set { _NumberOfFraction = value; }
  20:  }
  21:   
  22:  public int NumberOfInteger
  23:  {
  24:      get { return _NumberOfInteger; }
  25:      set { _NumberOfInteger = value; }
  26:  }
  27:   
  28:  public bool AllowNegative
  29:  {
  30:      get { return _AllowNegative; }
  31:      set { _AllowNegative = value; }
  32:  }
  33:   
  34:  public TextBoxType Type
  35:  {
  36:      get { return _Type; }
  37:      set { _Type = value; }
  38:  }


Attributes

In order to let the compiler know that there's a resource that should be attached here, we need to add an attribute to the namespace, as you can see in Code Snippet 1. We've specified the path of the JavaScript file following the pattern: "Project Name.Folder Name.File Name".

In Visual Studio, drag and drop any ASP.NET control to your page. It will automatically create the necessary tags and attributes. In order to let our control have the same behavior, we've added an attribute to the class name. Please refer to Code Snippet 1. {0} will be replaced by a value that you specify in your web.config or in any config file. For ASP.NET controls, it's by default asp.

Please refer to Code Snippet 4 to see how you can specify this value in your web.config. So when dragging and dropping our control to a web page, it will look like Code Snippet 5.


   1:  <!--//
   2:  // Code Snippet 4
   3:  //-->
   4:   
   5:  <pages>
   6:  <controls>
   7:  <add tagPrefix="mcc" namespace="MyCustomControls" assembly="MyCustomControls"/>
   8:  .
   9:  .
  10:  .


   1:  <!--//
   2:  // Code Snippet 5
   3:  //-->
   4:   
   5:  <mcc:NumericTextBox Text="" runat="server"></mcc:NumericTextBox>


Override OnPreRender

We need to override OnPreRender to implement the way we want the control to be pre-rendered. In other words, we want to let the OnPreRender method know that we want our control not only do what a normal textbox does, but also have other features.

There are basically two things that we're going to do in the OnPreRender method. The first thing is to add code that will let the method add a reference to our JavaScript file. And, the second this is adding calls to JavaScript functions on certain events. Please refer to Code Snippet 6.


   1:  //
   2:  // Code Snippet 6
   3:  //
   4:   
   5:  protected override void OnPreRender(EventArgs e)
   6:  {
   7:       base.OnPreRender(e);
   8:   
   9:       ClientScriptManager scriptManager = this.Page.ClientScript;
  10:       string resourceFilePath = "MyCustomControls.Resources.NumericTextBox.js";
  11:   
  12:       // This will register a Javascript block witht the name 'NumericTextBoxScript'
  13:       scriptManager.RegisterClientScriptInclude("NumericTextBoxScript",
  14:       scriptManager.GetWebResourceUrl(this.GetType(), resourceFilePath));
  15:   
  16:       if (this.Type == TextBoxType.Decimal)
  17:            this.Attributes.Add("onkeydown", string.Format("return CheckDecimal(this,'{0}','{1}', {2})", NumberOfInteger, NumberOfFraction, _AllowNegative.ToString().ToLower()));
  18:       else if (this.Type == TextBoxType.Integer)
  19:            this.Attributes.Add("onkeydown", string.Format("return CheckInteger({0})", _AllowNegative.ToString().ToLower()));
  20:   
  21:       this.Attributes.Add("onkeyup", string.Format("return CheckNegative(this)", _AllowNegative.ToString().ToLower()));
  22:  }


JavaScript Code


We're going to have three JavaScript functions. The first one, CheckInteger, will be called on the keydown event if the control is working as an integer textbox. The second, CheckDecimal, will be called on the keydown event when the control is working as a decimal textbox. Finally, the third function, CheckNegative, will be called on the keyup event no matter how the control is working.

CheckInteger will simply check whether the ASCII code of the character pressed is within the allowed list. It will also make sure that there's no more than one dash (-) in the textbox.

The reason why this function is being called on the keydown event, not the keyup, is that the keydown event is raised prior to setting the value of the textbox, so I still have a chance to terminate this action. Therefore, if the function returns false on the keydown event, the character won't be added to the textbox.

On the other hand, if the function returns false on the keyup event, nothing will change. However, the benefit of the keyup event is that it allows me to read the value of the textbox, since it's raised after the value has been set.


   1:  //
   2:  // Code Snippet 7
   3:  //
   4:   
   5:  function CheckInteger(allowNegative) {
   6:       if ((event.keyCode >= 48 && event.keyCode <= 57 && event.shiftKey == false) || // 0-9 numbers
   7:            (event.keyCode >= 96 && event.keyCode <= 105 && event.shiftKey == false) || // 0-9 numbers (the numeric keys at the right of the keyboard)
   8:            (event.keyCode >= 37 && event.keyCode <= 40) || // Left, Up, Right and Down
   9:            event.keyCode == 8 || // backspaceASKII
  10:            event.keyCode == 9 || // tabASKII
  11:            event.keyCode == 16 || // shift
  12:            event.keyCode == 17 || // control
  13:            event.keyCode == 35 || // End
  14:            event.keyCode == 36 || // Home
  15:            event.keyCode == 46) // deleteASKII
  16:                 return true;
  17:       else if (event.keyCode == 189 && allowNegative == true) { // dash (-)
  18:            if (sender.value.indexOf('-', 0) > -1)
  19:                 return false;
  20:            else
  21:                 return true;
  22:       }
  23:       else
  24:            return false;
  25:  }

CheckDecimal is very similar to CheckInteger. But they are different in certain things. CheckDecimal will treat a numeric character in a different way than the other allowed keys. This is because when a number is pressed, we need to check if the number of integers and fractions is still within the limits.

In addition, it will have a special treatment to the decimal point character. It shouldn't be the first character in the textbox, and it shouldn't appear more than once.


   1:  //
   2:  // Code Snippet 8
   3:  //
   4:   
   5:  function CheckDecimal(sender, numberOfInteger, numberOfFrac, allowNegative) {
   6:      var valueArr;
   7:   
   8:      if ((event.keyCode >= 37 && event.keyCode <= 40) || // Left, Up, Right and Down
   9:          event.keyCode == 8 || // backspaceASKII
  10:          event.keyCode == 9 || // tabASKII
  11:          event.keyCode == 16 || // shift
  12:          event.keyCode == 17 || // control
  13:          event.keyCode == 35 || // End
  14:          event.keyCode == 36 || // Home
  15:          event.keyCode == 46) // deleteASKII
  16:          return true;
  17:      else if (event.keyCode == 189 && allowNegative == true) { // dash (-)
  18:          if (sender.value.indexOf('-', 0) > -1)
  19:              return false;
  20:          else
  21:              return true;
  22:      }
  23:   
  24:      valueArr = sender.value.split('.');
  25:   
  26:      if (event.keyCode == 190) { // decimal point (.)
  27:          if (valueArr[0] != null && valueArr[1] == null)
  28:              return true;
  29:          else
  30:              return false;
  31:      }
  32:   
  33:      if ((event.keyCode >= 48 && event.keyCode <= 57 && event.shiftKey == false) || // 0-9 numbers
  34:  (event.keyCode >= 96 && event.keyCode <= 105 && event.shiftKey == false)) {  // 0-9 numbers (the numeric keys at the right of the keyboard)
  35:          if (valueArr[1] == null) {
  36:              if (valueArr[0].indexOf('-', 0) > -1)
  37:                  numberOfInteger++;
  38:   
  39:              if (valueArr[0].length <= numberOfInteger)
  40:                  return true;
  41:          }
  42:          else {
  43:              if (valueArr[1].length <= numberOfFrac)
  44:                  return true;
  45:          }
  46:      }
  47:   
  48:      return false;
  49:  }


When the key is up, the CheckNegative function will make sure that the dash/minus character is added to the left.


   1:  //
   2:  // Code Snippet 9
   3:  //
   4:   
   5:  function CheckNegative(sender) {
   6:      if (event.keyCode == 189) { // dash (-)
   7:          if (sender.value.indexOf('-', 0) > 0)
   8:              sender.value = sender.value.replace('-', '');
   9:      }
  10:  }

Implementing a Motor Race Using the Strategy Design Pattern

Introduction


In this article, we will learn about the Strategy Pattern by implementing it on a motor racing game. Strategy pattern is one of the many design patterns defined by the Gang of Four (GoF). A design pattern is a definition of a problem that other developers have faced before you, and they found a solution that might help you if you’re facing the same problem or a similar one. To know more about design patterns, please visit the www.dofactory.com site.

Background


Strategy pattern is used when you have objects that have many things in common but they also have different ways of behavior in certain situations. In this article, we'll design a small game (Motor Race), and we'll use Strategy pattern to implement the design. Again, this design is inspired by a solution that previous developers faced before and where they came up with this design pattern.

Game description


The game is a racing between different mobility motors; cars, motor-bikes, and buses; they all have many shared properties and behaviors, like, Motor Name, Color, but they also have different behaviors on certain points, like: the way that they look and get displayed, or the way they move. Cars and buses move on four wheels, but motor-bikes move on two wheels. The game will have many cars, motor-bikes, and buses racing. All the cars will have the same appearance, the same applies for motor-bikes and buses. Our goal now is to put a design for this game to be used in the client code, keeping in mind that we want our design to be reusable, meaning that if any time I decide to add a new mobility option (like a bike), I don’t want to rewrite the code for it, I'd just want to add the minimum amount of code and reuse the code that is already written. We also need our design not to have any redundant code, meaning if I have a code segment that is repeated in different places, I should group them in one place. Another thing to mention is that we’ll use C# to implement our design.


Using the code


First of all, let’s agree that we have three different types of objects that belong to the same group, and they have things in common; cars, motor-bikes, and buses are all mobility motors, so why don’t we make just one class for all of them and call it MobilityMotor and put all the shared properties in it, and then inherit this class into Car, MotorBike, and Bus? But the pattern doesn’t say so, because it's a better practice to implement an interface rather than extend and inherit a class, so what we should do now is create an interface and call it IMobilityMotor, putting the shared properties and methods there:

  1. // Code 1
  2.  
  3. using System;
  4. namespace MotorRace
  5.  
  6. {
  7.     public interface IMobilityMotor
  8.     {
  9.        // We will add new property later in this
  10.        // article to set the moving behavior of the object
  11.        string MotorName
  12.        {
  13.                get;
  14.                set;
  15.        }
  16.        string MotorColor
  17.        {
  18.                get;
  19.                set;
  20.        }
  21.        void Move();
  22.        void Display();
  23.     }
  24. }

Now, let's implement this interface three times, one for a Car class, one for a MotorBike class, and one for a Bus class. I'll show here how to make a Car class, and you can do the same for the MotorBike and Bus classes.

  1. // Code 2
  2.  
  3. using System;
  4. namespace MotorRace
  5. {
  6.     public class Car : IMobilityMotor
  7.     {
  8.         private string motorName;
  9.         private string motorColor;
  10.         // We will add new property later in this article
  11.         // to set the moving behavior of the object
  12.         public Car()
  13.         {
  14.             motorName = string.Empty;
  15.             motorColor = string.Empty;
  16.         }
  17.         public string MotorName
  18.         {
  19.             get
  20.             {
  21.                 return motorName;
  22.             }
  23.             set
  24.             {
  25.                 motorName = value;
  26.             }
  27.         }
  28.         public string MotorColor
  29.         {
  30.             get
  31.             {
  32.                 return motorColor;
  33.             }
  34.             set
  35.             {
  36.                 motorColor = value;
  37.             }
  38.         }
  39.         public void Move()
  40.         {
  41.             // We will add code later
  42.             // in this article to move object
  43.         }
  44.         public void Display()
  45.         {
  46.             // Add code here to display car,
  47.             // this code is only for car objects
  48.         }
  49.     }
  50. }

Now, just create two new classes for MotorBike and Bus, doing the same as you did for the Car. You will end up with a result that’s shown in the diagram below. Don't pay attention now to the MovingBehavior property in the MotorBike, Car, and Bus classes, you’ll understand it later in this article.


And now, we want to create classes to implement the moving behaviors, so we’ll create an interface and call it IMovingBehavior. This interface will be implemented by two classes: FourWheelsMoving and TwoWheelsMoving, and it will contain a Move() method that will be implemented by the two classes, as follows:

  1. // Code 3
  2.  
  3. using System;
  4. namespace MotorRace
  5. {
  6.     public interface IMovingBehavior
  7.     {
  8.         void Move();
  9.     }
  10. }

Now, let’s implement the IMovingBehavior interface by the FourWheelsMoving class, and then also by the TwoWheelsMoving class.

  1. // Code 4
  2. using System;
  3. namespace MotorRace
  4. {
  5.     public class FourWheelsMoving : IMovingBehavior
  6.     {
  7.         public FourWheelsMoving()
  8.         {
  9.         }
  10.         public void Move()
  11.         {
  12.             // We will add code later
  13.             // in this article to move object
  14.         }
  15.     }
  16. }

Let’s now understand what we have done. We have created two interfaces: one for a mobility motor (cars, motor-bikes, and buses), and another one for the way they move. As we mentioned before, there are two ways to move, either on four wheels or on two wheels. So, we implemented two classes from the IMovingBehavior interface, and we implemented three classes from the IMobilityMotor interface. In this design, we implement a high level of reusability, so if we need to add a new motor in the future, for example, a bike, or a lorry, all that we need to do is to implement a new class for it from IMobilityMotor, and if we have a new motor that moves on three wheels, or a motor that flies like a helicopter, then we just implement a new behavior class from the IMovingBehavior interface.

But the question now is how will a Car object know what its behavior is and the way it should move? To solve this, let’s add a new property to IMobilityMotor to set the correct behavior, and we’ll also add an implementation of this property in the Car, MotorBike, and Bus classes, as follows:

  1. // Code 1 (Updated)
  2.  
  3. using System;
  4. namespace MotorRace
  5. {
  6.     public interface IMobilityMotor
  7.     {
  8.         // We will add new property later in this
  9.         // article to set the moving behavior of the object
  10.         IMovingBehavior MovingBehavior
  11.         {
  12.             get;
  13.             set;
  14.         }
  15.         .
  16.         .
  17.         .
  18.         .

  1. // Code 2 (Updated)
  2. using System;
  3. namespace MotorRace
  4. {
  5.     public class Car
  6.     {
  7.         private string motorName;
  8.         private string motorColor;
  9.         // We will add new property later in this
  10.         // article to set the moving behavior of the object
  11.         IMovingBehavior movingBehavior;
  12.         public IMovingBehavior MovingBehavior
  13.         {
  14.             get
  15.             {
  16.                 return movingBehavior;
  17.             }
  18.             set
  19.             {
  20.                 movingBehavior = value;
  21.             }
  22.         }
  23.  
  24.         .
  25.         .
  26.         .
  27.         .
  28.         .

Now, we should implement the Move() method in the Car, MotorBike, and Bus classes, as follows:

  1. // Code 2 (Updated)
  2. using System;
  3. namespace MotorRace
  4. {
  5.     public class Car
  6.     {
  7.  
  8.         .
  9.         .
  10.         .
  11.         .
  12.         .
  13.  
  14.         public void Move()
  15.         {
  16.             movingBehavior.Move();
  17.             /* Here, the Car object will know that
  18.             movingBehavior is of type
  19.             FourWheelsMoving, because when its value was set
  20.             it was initiated to FourWheelsMoving instance,
  21.             so when we call the Move() method,
  22.             it will call the Move() method
  23.             in FourWheelsMoving class. */
  24.         }
  25.  
  26.         .
  27.         .
  28.         .
  29.         .
  30.         .


Conclusion


So we can now get to this conclusion: the Strategy pattern defines a family of algorithms, encapsulating each one by grouping similar algorithms in one place and separating the parts that vary.

Promotional Code for Udemy ServiceNow CIS - HR Practice Tests

If you're planning to become ServiceNow Certified Implementation Specialist - Human Resources (CIS-HR), you can prepare for the exam usi...